Wednesday, December 28, 2011

Something new. . . No Shampoo!


I came across a very interesting post a few months ago and decided to give it a go.  Giving up shampoo.  Your first thought might be, "Ewwww!" but you should still read on. :)

If you would like to read the post that I did, click here.  I'm all for making things myself rather than buying them.  Even though I can get many things for practically free with coupons, I would rather make something (cheaply) and know that everything in it I am putting on or in my body is free from many harmful chemicals.

The way that shampoo works is that it strips your hair of it’s natural oils. So your body reacts from it’s oil shortage by making more. Then you wash it the next day and strip the oils again, which means that once again your body produces more oil, you see how the cycle works. But by not using shampoo you let the hair oil factory regulate it’s oil production levels to create a healthy balance.
http://asonomagarden.wordpress.com

So, I decided to try out using baking soda instead of shampoo.  It was a pretty risky venture since I tried in out on a Saturday night before Sunday church. :)  I don't know what I was thinking!  BUT, I was pleasantly surprised with the fabulous hair day that I had!  My hair felt totally light and soft and bouncy and it straightened and/or curled just the way I wanted it to!

Do you want to try it out now?  Here's the recipe I used--

1 cup water
1 Tblsp. baking soda

Mix and put in some kind of bottle with a squirty top. 

And that's it!  I had a larger bottle that fit about 4 cups of water and 4 tablespoons of baking soda so it is still sitting in my shower and I use it every 2 to 3 days.  An old shampoo bottle would work great.   I squirt some on top, around and underneath to cover all my hair and scrub it around like shampoo.  Now, it doesn't make  a lovely lather of scented bubbles, so if that is what you love, you might not like this, but I think the end result is worth it.  I do still use conditioner on my hair after I use the baking soda mixture.  I haven't explored the options when it comes to conditioner yet, so we'll see.   


So, just another wonderful use of this amazing stuff!  


Pin It

Monday, December 19, 2011

DELICIOUS Peanut Butter Kiss Cookies

I have started to make way too many goodies for Christmas.  I try to give them away before I eat them all...:)  
Here is a super yummy recipe for Peanut Butter Kiss Cookies

1 cup butter
 1 1/4 cup brown sugar
1 1/4 cup sugar

Cream together, then add:
3 eggs (I always use powdered eggs for baking)
1 cup peanut butter (creamy or crunchy)
2 tsp vanilla

Mix, then add:
2 1/2 cups flour
1/2 tsp baking soda
1/8 tsp salt

Mix.  Roll into balls.  Flatten slightly.  Put Hershey's Kiss in the middle.
Bake at 325 degrees for 11-12 mintues


Just a little note...if you think the cookies don't look quite done and want to wait until they are looking slighty brown--you will bake them for too long.  (From personal experience. :)  Just bake them for the 11 to 12 minutes and take them out because they will be done.   Also. . . I usually double the recipe to make LOTS.   I either give them away or stick them in the freezer for later.

ENJOY!!


Pin It

Friday, December 16, 2011

Christmas Gifts

I downloaded a WONDERFUL eBook from a favorite website of mine,  http://heavenlyhomemakers.com/.  The book is called Gifts in a Jar and has a ton of great ideas.  Here is the link, it is a free download.  

So, today I made up the recipe for Peppermint Sugar Body Scrub.  It took literally 2 minutes to make.  Here's the recipe:
1/2 c sugar (side note...what a great thing to do with refined white sugar without eating it!)
1/4 c olive oil
10 drops peppermint oil
1 drop eucalyptus oil

Mix well and put in a jar.  


I gave one of these to my daughter's teacher and am giving them out to some friends and I am searching for more jars because it was just so fun to make!  


Pin It

Saturday, November 19, 2011

The Most AMAZING Pumpkin Bar Recipe. . .

This is the most delicious recipe for pumpkin bars.  I can't stop making them.  But, then I have to give them away so I don't eat them all. :)  I used real pumpkin from my garden (take a look at my previous post, although you may use canned pumpkin).   

Pumpkin Bars
Heat oven to 325 degrees and grease a 15 x 10 pan.

2 cups sugar                                    2 cups flour
2 cups pumpkin                           2 tsp. baking powder
4 beaten eggs                                   1 tsp. soda
¾ cup melted butter                      ½ tsp. cinnamon

Pour combined ingredients in pan and bake for 25-35 minutes, cool completely and frost.

Frosting:
3 cups powdered sugar                             1 Tbsp. milk
3 oz. cream cheese                                    1 tsp. vanilla
6 Tbsp. soft butter


And here is a piece of the finished product.  I made these yesterday, and yes, they are gone. . .BUT, I did give most of them away. . . :)

I am apologizing in advance for your waistline...
Pin It

Friday, November 18, 2011

What to do with that pumpkin...

Many of you might have leftover pumpkins from Halloween, or your garden.  Well, this is what I did with mine...


I had a few smaller pumpkins, so I found it easiest to cut them in smaller pieces and then clean them out with a knife and spoon.  If anyone knows an easier way to clean out a pumpkin...please share! :)


And, here's my pan full of pumpkin...I put a little bit of water in the pan to prevent the pumpkin from sticking and burning.


We have chickens, so I took all of the seeds out to soak in salt water and then fed the rest to the chickens.  They love it. 


I baked the pumpkin for about 40 minutes on 350.  If your pumpkin is larger, you will need to cook it longer.  You can check it with a fork to make sure it is soft.


Next, I scraped out the inside of the pumpkin and put it in my blender:  I added just enough water to help it blend.


And here's the nice smooth pumpkin...


Now, I have an amazing recipe for pumpkin bars (that will be my next post) that uses 2 cups of pumpkin, so I measured out 2 cups of pumpkin and put it in a Ziploc bag to put in the freezer.  This way when I want to make them, I can just take the bag out, thaw the pumpkin and use it in my recipe.  


I haven't baked my seeds yet, they are still soaking on my counter.  When I do, I will put them on a baking sheet sprayed with oil and bake at 350 for about 15-20 minutes--just until they are slightly browned. Then turn my oven off and let them sit in there while it cools.  They are absolutely delicious!!


Pin It

Thursday, November 3, 2011

Potato Latkes

Each month I put together a dry pack canning project for my ward at church.  We usually can items like wheat, beans, flour, oats, etc. that the LDS Cannery offers. This month, I decided to try something different and we canned potato shreds and potato slices (dehydrated) from Winco.  It was a huge success.  We canned almost 300 cans (the big #10 ones).

Since lots of people have them now, I decided to post a yummy recipe using the potato shreds.  I made these tonight for dinner and even my SUPER picky eater thought they were pretty good.  

Here's my can (I had bought this awhile ago, it's not one we just canned)


Here's the recipe:

POTATO LATKES
 (I always forget how to pronounce them. . . )

Boil 4 cups of water (it doesn't have to be exact)
Add 1 1/2 cups dehydrated potato shreds (turn stove off0
1/4 c dehydrated onions (or you can use fresh and add in with other ingredients)
Let sit for 10-15 minutes
Drain water out 

Pour potatoes/onion into a medium sized bowl and add the following:
2 eggs (I used real, but I might try powdered next time to make it a great food storage meal)
1 tsp salt
1/2 tsp pepper
Mix ingredients together
Scoop 1/4 cup of mixture into a frying pan with hot oil and flatten a little
Brown for a few minutes on each side
Top with sour cream and applesauce-- or I just like ketchup

Here are my re-hydrated and drained potatoes:


Here's my mixture (my daughter loves to help):


Here they are frying on the first side:


And after I flipped them:  


Place them on a paper towel to drain the excess oil.


I used an electric skillet to cook mine and I had the temperature set to 300 degrees.
And there you go!  Enjoy!


Pin It

Wednesday, November 2, 2011

Apple Cinnamon Fruit Leather

After canning 124 quarts of applesauce, I still had some apples leftover.   I got a GREAT deal on them at $.13/lb at my local orchard.  So, I decided to make apple cinnamon fruit leather.  My blender was having issues, so I used my food processor to chop the apples up.  It was a little chunkier than when blended, but it still turned out fine.  All I did was wash, quarter and cut the seeds out of the apples and then put them in the food processor.  I added in some cinnamon (sorry, I don't measure a lot) and kept mixing. Then I spread it out on my trays and stuck in my dehydrator. 


Here it is out of the dryer. 

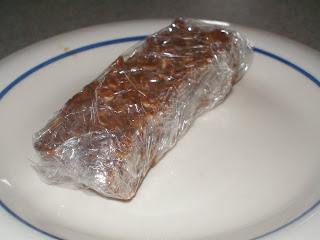
And the final product all rolled up in plastic wrap.  It is delicious!


Pin It

Q & A

I love getting comments on my blog. . . it really motivates and inspires me to do more, so thank you for your comments.  There was a question about what to do with leftover Halloween candy.  I have a few recommendations:

First, much of your hard candy (i.e. Jolly Ranchers, suckers, anything hard) you can actually dry pack can into #10 cans, if you have that available to you.  In my ward at church, we dry pack can each month, and you can bring your own food to can.   We put an oxygen absorber in the can, then fill it with the food, put the lid on and seal it with a #10 can sealer.

Second, you can vacuum seal it with a Food Saver, or other brand sealer.  I have a post here where I have vacuum sealed granola and wheat nuts.  You can totally vacuum seal candy--even chocolate!  Although, if it is for long term storage, I would put it in a box labeled "Broccoli" or something like that. :)  If you want to seal up something in smaller packages like mini candy bars, or packages of M&M's, then take a straight pin and poke a couple holes in the packaging so that the oxygen can be sucked out of the inside of the wrapper.  I love vacuum sealing, because you can preserve food that would otherwise go rancid quickly, like brown sugar, brown rice, and nuts.

Last, if you don't have either of those methods available, you can simply store it in a glass jar.  Plastic is okay, if it is PETE plastic, but glass if preferable.  You may put in an oxygen absorber if you really want to.  But, hard candy would probably be fine for a long time just in a jar.

Now, I am not an expert on the best way to store candy, but this is what I would do (and probably should because we have WAY too much candy around here right now!).

Thank you, Christina, for your question!

Thursday, October 20, 2011

I made deodorant!

So, here's another thing I've thought for awhile about trying, and finally got around to it.  Homemade deodorant.  I think the fact that I am almost out pushed me to do this. :)  It is so easy.  I literally took less than five minutes.  I watched a video on You Tube before making it and it was as easy as it looked.  The lady on the video said that she and her husband have been using it for 2 years and have been totally happy with it.  So why not try it out?  
Here's the link if you would like to watch it: http://www.youtube.com/watch?v=ar0BF6hMuGE&noredirect=1


This is all I used :  1/4 cup baking soda
1/4 cup corn starch (or she uses arrowroot powder)
6 Tblsp. coconut oil
Put them in a bowl and start mixing!  

 This is what it looked like when I was done:


And then I put it in this little 1/2 cup jar.  It is better to keep in a glass jar, rather than plastic.


And there you go!  You can apply it with your fingers, or if you don't want to do that, put it in an empty deodorant container and use it like normal.  


Pin It

Wednesday, August 31, 2011

Tis the Seasonings. . .

In the back of my mind, I have wanted to do this for a while.  And, I finally did!  I made my own taco seasoning, dry onion soup mix, and dry ranch mix.  It was pathetically easy.  Why did it take me so long to try?  I don't know.  I found these recipes on http://heavenlyhomemakers.com/recipes-2/condiments.  

Taco Seasoning:

1/2 cup chili powder
1/4 cup onion powder
1/8 cup ground cumin
1 tablespoon garlic powder
1 tablespoon paprika
1 tablespoon sea salt

Put ingredients into a jar and shake.


Dry Onion Soup Mix:
2/3 cup dried, minced onion
3 teaspoons parsley flakes
2 teaspoons onion powder
2 teaspoons turmeric
1 teaspoon celery salt
1 teaspoon sea salt
1 teaspoon sugar
1/2 teaspoon ground pepper
Mix all ingredients in a jar, then give the jar a good shake.  I’d recommend shaking the jar to mix the ingredients well before each use. 
Use 4 tablespoons in a recipe in place of 1 packet of onion soup mix.  Store this in a dry, cool place. 


Ranch:
5 tablespoons dried minced onions
7 teaspoons parsley flakes
4 teaspoons salt
1 teaspoon garlic powder
Mix together and store in an air tight container.
For dressing: Mix 2 tablespoons dry mix with 1 cup mayonnaise and 1 cup buttermilk or sour cream.
For dip:  Mix 2 tablespoons dry mix with 2 cups sour cream.
Mix up a few hours before serving, so the flavors all blend.


Here are my finished products.  I doubled each of the recipes and ended up with a perfect amount for a pint jar.  They are delicious and I feel so much better using these than store-bought seasoning mixes that are full of MSG and lots of other unnecessary and unhealthy chemicals. :)


www.thegrantlife.com


Pin It

Tuesday, June 21, 2011

Some new stuff. . .

So, I've been doing some fun stuff, I just haven't had time to post.  So, I'll try to get it all up.  First of all, I have a new favorite website.  It is:  http://heavenlyhomemakers.com/ .  I've been trying to feed my family healthier foods and cut out all that yucky stuff like hydrogenated oils and high fructose corn syrup and any other chemical listed on an ingredients label that I can't pronounce. 

So, I have found some fantastic recipes on this website and have tried out quite a few and want to share what I have done.  Well, have you ever checked out your ingredients labels. . . particularly on crackers and snacks?  Ugh.  I guess I have to make my own.  Which I LOVE to do.  I would much rather eat something that I have made then buy it at the store.  Anyway, here's a super yummy granola bar.  LOVE THEM!  And my kids like them and I can sneak healthy stuff in them like sunflower seeds, sesame seeds, coconut and even raw pumpkin seeds (although I couldn't get those past my son, the green was not completely covered by the chocolate).  

If you want to see her lovely pictures and step by step.  Here are the basic directions:
Homemade Chewy Granola Bars
1/2 cup peanut butter or sunbutter
1/3 cup honey
1/4 cup coconut oil (or another oil of your choice)
1 cup oats
1 cup total of any combination of:  sesame seeds, coconut flakes, sunflower seeds, dried fruit, mini chocolate chips
In a medium sized saucepan, melt together peanut butter, honey and coconut oil.

Remove from heat and add one cup of oats.  Choose your favorite combination of coconut flakes, sesame seeds, sunflower seeds, dried fruit and mini chocolate chips, to equal a total of ONE CUP.  (I just got out my one cup measuring cup and poured in the ingredients until the cup was full.)  Pour in and stir well.
Stir well, then spread mixture into a 8×8 or 9×4 pan.
Chill for two hours, then cut into bars.
Wrap in plastic wrap for a quick grab and go snack!


Pin It

Monday, March 21, 2011

A Whole New World -- Powdered Dairy

I have had a can of butter powder for awhile that I've been wanting to try out, so I opened it today and bravely used it in a batch of chocolate chip cookies. Well, I wasn't THAT brave, I used half real butter and half powdered butter. My husband always tells me that I try too many variations at one time and then things don't turn out as well. :)


And, just for kicks, here is my favorite thing: Powdered Eggs. I love to use these especially in baking, then I don't feel bad about eating dough or letting my kids eat the dough.

So here's my chocolate chip cookie recipe. I've been making these since I was 8 years old.


1 c butter (or in this case, 1 cube of butter and 1/2 c of powdered butter and 1/4 c water, maybe next time I'll do all powder)

3/4 c sugar

1 c brown sugar

MIX

2 eggs (powdered or regular)

1 t vanilla

MIX

3 c flour

1 t baking soda

1 t salt

1 1/2 c chocolate chips


Bake at 350 for 10 minutes.


Here's how the dough looked:


Pretty good! Note: I used 1/2 c butter powder to replace 1/2 c of real butter in the recipe--a straight 1 for 1 substitute. I also added about 2 T of water. The instructions on the can weren't very clear on how to use it, so I just guessed. Next time I will add a little more water, but they did turn out great anyway. ****Thanks to my sister-in-law for the info: When you use powdered butter, use 1 part butter powder 1 part water. Thanks, Cori!


And here's a second correction.   Now that I have made these several times. . . I have found that using a part butter powder and 1/2 part water makes the perfect cookies.  So, I have corrected the recipe above . . . again. . . sorry!


Here is the finished product. The missing cookie was in the process of being eaten at the time. I had to test them out! And they were good!!


Overall, I was VERY happy with how they turned out! I will be doing more experimenting with powdered butter in the future!


Pin It