Wednesday, December 29, 2010

Organized Spice

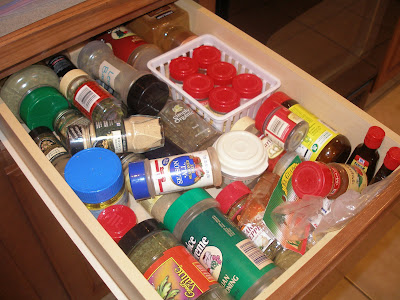
So, I finally found the time to organize my spice drawer! I have been saving baby food jars and collecting them from friends and family (Thanks!) to use in my project.

This drawer is right next to my stove, so it is a very convenient place for all of my spices, but as you can see, it has become more inconvenient to find or get anything out of that drawer.


So, here's what I did: I took the jar lids out to my garage and spray painted them (with the door open) black. It was a pretty simple and easy job.


Then I filled my jars with spices, put the lids on them and printed out nice little labels for the lids. Doesn't that look great! I am so excited to cook something now! :)


What a great use for empty baby food jars!


Pin It

Tuesday, November 16, 2010

Ezekiel Bread

So, I made Ezekiel bread for the first time and I was very pleased with how easy it was and how well it turned out! It is nothing like what you can buy at the health food store in the freezer section. The recipe I used turned out just like regular homemeade wheat bread.


I started by grinding the following grains all mixed together:
5 cups wheat
1 cup barley
1 cup rye
1/3 cup millet
1/4 cup pinto beans
1/4 cup soy beans
1/4 cup lentils
1000mg vitamin C tablet (acts a a natural dough enhancer)

(I was able to find all these grains at WinCo in the bulk section)


This is what I ended up with:


Here's the recipe:

5 cups warm water
3 Tbs. yeast
½ cup honey
1 stick of butter
2 Tbsp salt
½ the flour mixture

Mix until blended.

Add ½ cup vital wheat gluten (you can use gluten flour. . . also at WinCo) and gradually add in the rest of the flour, kneading to make a smooth dough, about 10 more minutes. Allow dough to rise ½ hour before shaping into 4 loaves. Rise a second time for ½ hour, and bake at 350 for 25-35 minutes.

Here's my mixing dough:


And here's my nice smooth dough:


The loaves before rising (my girls like to make their own loaves):


After rising:


And out of the oven:


My bread turned out just slightly denser than my wheat bread, but it stayed soft for a very long time. It makes delicious sandwiches or toast. I made grilled cheese and my kids had no idea it was any different than my normal bread, and yet they are getting so many more healthy grains in them!


If you don't have a grinder and are a neighbor or friend, I'd be happy to grind some grains up for you! Just let me know!

Enjoy!


Pin It

Wednesday, September 29, 2010

Granola!

I had such a great time at our Self-Reliance class last night! Thanks to all of you that came!! I have posted the recipes for granola bars and yogurt, so now I am going to post the granola recipe. . . or maybe a couple recipes. Sorry, I didn't get a picture of it! Maybe I'll take one and add it later.

Granola

6 cups regular rolled oats (not quick)
1 cup wheat germ
1/3 cup powdered milk
1 cup coconut
1/2 cup sesame seeds
1 cup sunflower seeds
1/2 tsp salt (oops. . . I forgot that last night! Oh, well, it still tasted good!)
1 cup slivered almonds
1/2 cup honey
1/2 cup brown sugar
1/4 cup oil
1 1/2 tsp vanilla
1 1/2 cups dried fruit

Mix dry ingredients. heat oil, honey, and brown sugar until warm, stirring. Combine dry and wet ingredients and pour onto large cookie sheet. Bake at 300 degrees for 25-30 minutes, stirring every 10 minutes. Add dried fruit in for the last 5 minutes of baking.

Here is another recipe for granola that I have been making:

6 cups regular rolled oats
1/4 cup sunflower seeds
1/2 cup brown sugar
1 cup coconut
1/3 cup sesame seeds
1 cup raisins
1 cup chopped nuts

Mix everything but raisins. In a separate bowl, whisk together:

1/2 cup oil
1/3 cup honey
2 tsp vanilla

Pour liquid mixture over dry ingredients and stir to coat evenly. Spread on large cookie sheet and bake at 350 degrees for 30 minutes stirring frequently. Add raisins during the last 5 minutes of baking.

As you can see, there are many similarites to granola recipes. My advice is to use what you like (or what you have) in your granola and make it your own favorite. I like to add cinnamon to my granola sometimes. Other times, I will combine different recipes together. I don't think I've ever made the same granola twice! It's fun to try new things. One thing we put in our granola last night was pumpkin seeds (even though it wasn't on the recipe). Try it out and enjoy!


Pin It

Making Yogurt

One of the greatest things I've discovered lately is homemade yogurt!! It is SO easy and healthy. The only special tool that you need is a candy thermometer. You can find them at Wal-Mart for $3-$4.

Here's what you do:

Put 7 cups of milk (I use 1%, but you use what you like) in a pan on the stove.

Whisk in 1/2 cup of powdered milk.

Stick your thermometer in and heat up the milk (on about medium heat) until it reaches 200 degrees.


(Sorry I don't have anymore pictures right now, but I am anxious to get this posted).

Pour the heated milk into a pitcher (not glass. . . just speaking from experience. . . .CRACK)

Stick your thermometer in it and wait until the milk cools to 110 degrees. This takes about an hour, so make sure you have the time!

Add 1 cup of plain yogurt (Dannon plain is the best to use as your initial starter). After that, you can save 1 cup of the yogurt you make to start your next batch. You can even stick it in the freezer if it's going to be awhile until you make yogurt again.

Stir it up well and pour into four glass pint jars. Put lids and rings on them. (You do not need a new lid, just use a clean one that has already been sealed before).

Now. . .you have a few options. . . the goal is to keep the jars at 100 degrees for 9 hours. . . .

#1 Wrap jars up in a warm fleece blanket or some towels and place in a small cooler. When I did it this way, I put the cooler in the sun. . . I don't know if that is necessary or not, but it turned out great!

#2 Warm your oven up to the coolest setting. Turn it off and place your jars in the oven. It might be best to do this at night when you will not be using your oven. Then the yogurt will be done in the morning.

#3 I have a square dehydrator where the trays come out and I can put my yogurt right in and turn it on to the right temperature for making yogurt.

Let your yogurt culture for 9 hours and then put in the fridge.

A few notes:

*To make vanilla yogurt, add 1/3 cup (or more) of sugar and 2 Tbs. of vanilla when you are heating up the milk.

*If you would like fruit yogurt, add a few spoonfuls of jam to the bottom of your pint jars before you pour the heated milk in.


*A lot of the time, I will make just the plain yogurt and then add a small spoonful of jam to it, along with some homemade granola and dried or fresh fruit and it is DELICIOUS!


Whew!! It really isn't that complicated. . . I just wanted to give you all the details! Enjoy!!


Pin It

Granola Bars!

I've been searching for a good granola bar recipe, and I have loved this one! I hope you all enjoy it!

4 1/2 c rolled oats (regular, not quick)

1 c flour ( I like to use whole wheat flour)

1 tsp baking soda

1 tsp vanilla

2/3 c butter, melted

1/2 c honey

1/3 c brown sugar, packed

1/2 c mini chocolate chips (raisins, craisins, other dried fruit, whatever you like!)
Combine all ingredients but the chocolate chips (or whatever you are putting in). Mix and then add the chocolate chips in and mix again. Press into a greased pan. Bake at 325 degrees for 18-22 minutes. Enjoy!!

**this is a basic recipe. . . if you like other things, try putting them in and make it your own recipe! Nuts, seeds, coconut, peanut butter. . . the options are endless!**

Here they are pressed into my pan. I made a double batch the other day and fit it in this pan. It makes them a little thicker, so I just cut them a little smaller


Once they've cooled off for a few minutes, cut them up to your desired size. They are VERY filling, so keep that in mind, especially if you have young kids.


Once they have cooled completely, I like to wrap them individually in plastic wrap and store them in a big ziplock bag. You can also use the snack size baggies to put each one in. What a yummy and healthy snack your kids have to come home to! (And yummy for mom, too!)


Thursday, September 2, 2010

Yogurt Chips

In case you haven't noticed. . . my dehydrator has been working nonstop lately! I have been wanting to try these yogurt chips for awhile, and I finally did it today!


It was sooooo simple. I scooped a small spoonful of strawberry yogurt all over my trays and stuck them in the dehydrator.


I put them in my dehydrator about 9AM this morning and took them out at about 7PM. They do take awhile, but they turned out great!


They are soft, pliable and tasty! What a nice healthy snack. :)


Fruit Leather

I have the secret to perfect fruit leather! Mix your fruit with applesauce or pearsauce! I made fruit leather yesterday and I mixed purreed peaches with pear sauce that I canned last summer. The ratio I used was about half peaches and half pear sauce. Here are some of my lovely peaches (by the way, I never peel fruit that I make into leather, I just blend it all up, skins and all):


And here is my pear sauce:


All I did was blend it together with a little lemon juice and pour it onto my trays.


Here's what it looked like out when finished drying:


Since I end up with huge pieces of fruit leather, I tear them in half, roll them up, and then roll them in plastic wrap. My girls were chowing these down like candy all day today!


For any other fruit leather you want to make, you can use 1 cup of pureed fruit to 2 cups of applesauce or pear sauce. The sauces help it to turn out more pliable and not so crispy (I tend to over dry sometimes, so I used to get crispy leather). This also helps to stretch your fruit further.
I made some with nectarines a few weeks ago, 1 cup of nectarines to 2 cups of pear sauce. It was so good I didn't even have a chance to take pictures! It just disappeared!


Tuesday, August 31, 2010

Dehydrated Corn


So, instead of doing freezer corn this time, I decided to try something a little different. I dehydrated it! I think it will be perfect to throw in soups or stews, but we probably won't reconstitute it and eat it just as a side dish.


First, I shucked it, of course. :) Then boiled it for three minutes.


And then I put it into a bowl of ice water.


Next, I cut it off the cob and spread it out on my dehydrating trays.


I filled my dehydrator last night and this morning the corn was all dried and looked great!


The last thing I did was put the corn in jars (it filled a 1/2 gallon jar and a pint jar) and vacuum sealed them! Ta da! I am so excited about this! I can open them up whenever I make soup or stew this winter and sprinkle some corn right into my pot and then vacuum seal the lid right back on! Nice!


Oh, the things that make me happy. . . :)


Sunday, August 29, 2010

Buttermilk Cornbread

So, I tried out a new cornbread recipe and LOVE it! Plus, I broke out the solar oven that I got for my anniversary/birthday/Christmas present last year (I was very unmotivated while pregnant). I love that, too! So, I put both together and this is what I got:

Buttermilk Cornbread
1/2 cup butter
2/3 cup sugar
2 eggs (or 2 T powdered eggs 1/4 c water)
1 cup buttermilk (I do my own with 1 T lemon juice to one cup milk)
1/2 tsp. baking soda
1 cup cornmeal (if you have a grinder--grind up yellow popcorn for the most delicious
cornmeal!!)
1 cup flour
1/2 t salt
Melt butter. Stir in sugar. Add eggs and beat until well blended. Combine buttermilk with baking soda and stir into mixture. Stir in cornmeal, flour, salt until well blended. Bake at 375 degrees for 25-30 minutes.
*OR*
I put my solar oven outside to preheat (it heats up to 300 degrees in 20 minutes and I've had mine get as hot as 375 so far)
Then I put it in and let it cook! It does take a little more time to cook, but not much.


I just took mine out when it looked done. It was delicious!!


Even two days later, it was still moist! Cornbread--moist? Yep!!


Homemade Laundry Soap

If you do not do this yet--then you must begin now!!! I have been making my own laundry soap for two or three years now (I can't remember) and I love it! It works great and it saves you TONS of money.

There are a bunch of recipes out there for laundry soap, you can try out different ones, if you like. Here is the one that I use and love:

1/3 bar of Fels Naptha soap, grated

1/2 c Arm & Hammer Washing Soda (not to be confused with Baking Soda!)

1/2 c 20 Mule Team Borax

I get all of my ingredients at WinCo. This probably costs around $7 for these three items, and just think of how many batches you can make out of each box! Fels Naptha runs about $1 and I use a 1/3 of the bar for each batch. I grate up the entire bar and then put it in three separate ziplock bags, so I don't have to grate it up each time I make some.


-First, in a large pot on the stove, heat up 6 cups of water and pour in your 1/3 bar of grated Fels Naptha soap. Stir until dissolved (just on medium heat. . . don't bring to a boil).

-Then add in the washing soda and borax and stir until dissolved.

-Add 4 more cups of water.


Now what you do next will depend on how you are going to store your soap. This recipe makes 2 gallons. I have one of the old Costco laundry soap containers that this fits perfectly into. But, if I didn't, this is what I would do:

-Put 1 gallon, plus 6 cups of cold water into a two gallon bucket, or container. (I put this right into my laundry soap container using a funnel)

-Pour your soap mixture from you pot into the bucket or container. (Again, I put it right into my container)

-Stir or shake until it is all mixed up. (At this point, if you are not using a laundry soap container, pour your mixture into whatever containers you will be using to dispense the soap. You can pour it into two different containers if you don't have one big enough).

-Let it sit for 24 hours before using it.


You must SHAKE the container before you use the soap EACH TIME. It gets really gloopy.

Use 1/2 cup per load.

The price to make a two gallon batch of soap is less than $1. I'd say that's a pretty big savings compared to the price you pay in the store!!


Tuesday, April 13, 2010

New Bread Recipe

So, I tried a new bread recipe for fun that I got from a lady at the cannery. I loved it! Here is the recipe:


Whole Wheat Bread
makes 4 loaves

7 c whole wheat flour
2/3 c wheat gluten
2 1/2 T instant yeast

Mix for 1 minute. Then add 5 cups warm water and mix for 1 minute. Let rest for 10 minutes.

Add:
1 T salt
2/3 c oil
2/3 c honey
2 1/2 T lemon juice

Mix for 1 minute. Then add:

5 more cups whole wheat flour mixing after each cup

Knead for 10 minutes (in mixer). Shape into loaves and place in pan. Let rise to top of pan.
Bake at 350 for 25 minutes.


They turned out beautiful and delicious! I actually used half wheat flour and half white flour, just because I only had that much wheat flour and I didn't want to grind more at the time. :) But, I made it again yesteday with all whole wheat flour and it turned out great, again.

Enjoy it!!


Monday, April 12, 2010

Have you tried this?

So, after the preparedness fair (see previous post), I had a few leftover wheat nuts and some granola that I wanted to save. I used this vacuum sealing method to vacuum pack my food into quart size canning jars. It is awesome! You can seal and save so many foods that you cannot preserve otherwise (wet pack canning, dry pack canning, etc.). Foods like brown rice, raisins, chocolate, nuts and things that normally go rancid will stay good for years sealed in a jar.


So, me and my little helpers went to work. Kayla (2 years old) was busy filling up my jars.


Lily (4 years old) put on the lid (just the flat lid, not the ring) and then the handy sealing top that you see connected by a tube to my food sealer (it's just a generic version of a Food Saver).

I worked the sealer and here you go-- granola and wheat nuts sealed in jars ready to be stored for a long long time.


The girls and I were having so much fun that we ended up sealing a few jars of chocolate chips and craisins while we were at it. It is addicting! I am excited to start sealing up more food!